Getting Started with Single Sign On (Microsoft)
If you would like to start using Microsoft to sign in, reach out to your account manager to get this enabled and accept required terms and conditions.
Once you have had SSO enabled within your account, you are able to start creating or converting users to SSO.
Creating a new SSO user:
Login to the platform on ‘https://platform.data-crypt.com/login’ and create a new user in the user management section of account settings.
Creating the new user is done by pressing the ‘+’ icon from the right-hand side of the user management menu. By clicking this you will now see the option to select the ‘User Login Type’. This refers to the options ‘standard’ (Normal user set up, with the ability to assign username and password as well as 2fa etc), or in this case, ‘SSO’ (ability to sign in using Microsoft account).
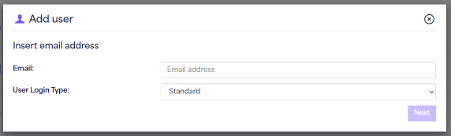
By selecting ‘SSO’ from the drop-down menu and clicking ‘Next’ you will then be required to input the users first name, last name and tenant/object ID.

To retrieve the tenant and Object ID, you will need to access your azure directory. The overview for your Azure directory should show your tenant ID and other account information, simply copy this into the ‘tenant ID’ section.
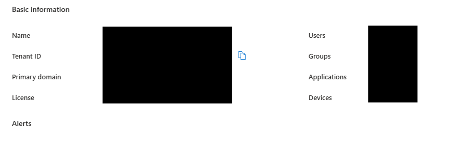
To find the object ID for the user you’re creating, access the left hand panel menu and select ‘users’, this will now show a full directory overview of the users within your azure account (alternatively the top search bar on this page will allow you to search for the user).
Click or search for the user you wish to create, and copy the ‘Object ID’ from this page, pasting it into the ‘Object ID’ section within the Force24 platform.
Once these have been inputted, you can then click ‘Next’ where you will assign user permissions, and then confirm the account information is correct.
After the account has been created, an email will be sent to the newly created user to confirm the account, they must click on the link within the email, and then press the ‘confirm’ option on the tab that appears.
From this point they will be able to login using their SSO account via the platform login screen.
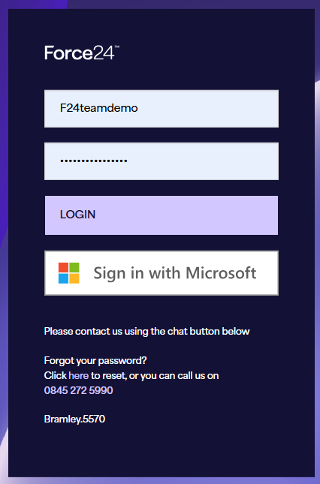
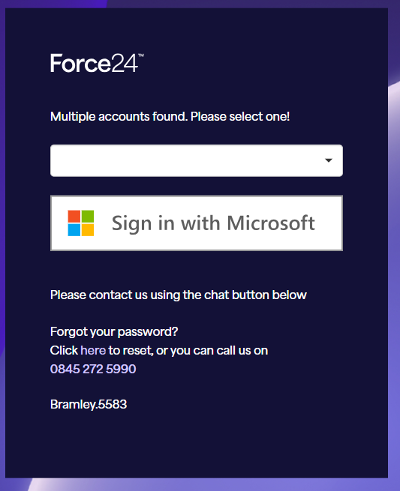
By selecting ‘sign in with microsoft’ you will see all Microsoft accounts in use, and be able to click on this user to log in to associated accounts.
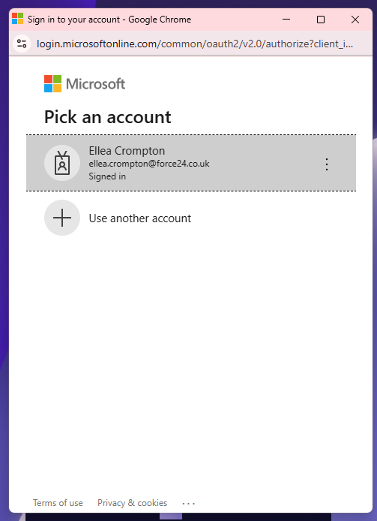
In the case where the user exists in multiple accounts that use ‘SSO’, the following modal will appear ahead of logging in.
Convert existing user to SSO:
If you would like to convert an existing standard user to SSO, simply login to the platform on ‘https://platform.data-crypt.com/login’ and access user management from the settings page.
You should now see all existing users and click the ‘…’ option besides the user you wish to convert.
By selecting ‘convert to SSO’ from the drop-down menu, you will see the option to input your tenant ID and Object ID.
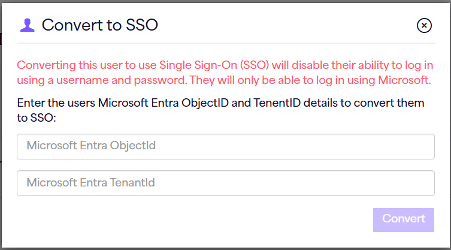
To retrieve the tenant and Object ID, you will need to access your azure directory. The overview for your Azure directory should show your tenant ID and other account information, simply copy this into the ‘tenant ID’ section.

To find the object ID for the user you’re creating, access the left hand panel menu and select ‘users’, this will now show a full directory overview of the users within your azure account (alternatively the top search bar on this page will allow you to search for the user).
Click or search for the user you wish to create, and copy the ‘Object ID’ from this page, pasting it into the ‘Object ID’ section within the Force24 platform.
Once these have been inputted, you can then click ‘convert’ and it will convert the user to an SSO user using Microsoft (retaining all existing user permissions).
After the account has been converted, an email will be sent to the newly converted user to confirm the account, they must click on the link within the email, and then press the ‘confirm’ option on the tab that appears.
From this point they will be able to login using their SSO account via the platform login screen.
By selecting ‘sign in with microsoft’ you will see all Microsoft accounts in use, and be able to click on this user to log in to associated accounts.
In the case where the user exists in multiple accounts that use ‘SSO’, the following modal will appear ahead of logging in.
