
This article shows you how to add and create new Objects and fields to hold your Nexus data.
Adding a new Object
- Open the Nexus dashboard from the left-hand toggle menu.
- Go to the Settings section of the dashboard. Here you will find all your pre-created Objects, as well as the option to click Add to create a new Object and fields. If you have never created an Object before, you will be taken to this page by default.
- Once you click Add, you can choose how you will be adding the data in future, which informs how the data structure should look. This might be via RSS, or via an integration or data upload.
Using the External Data option
If you are using the standard External Data option:
- Select External Data.
- Name your Object and give it a description.
- Begin creating the fields within your Object. Pay special attention to the data type, to make sure the data you plan to input matches the required parameters.
- Once you are happy with the fields and all the ones you need are listed, click Finish adding fields.
- Publish your fields so you can use them in other areas of the platform, such as the Email Builder and Journey Manager.
Forgot a field?
Do not worry if you forget to add one at this stage. You can update your fields in future if required.
Using the RSS option
If you are using the RSS option:
Step 1: Add your feed details
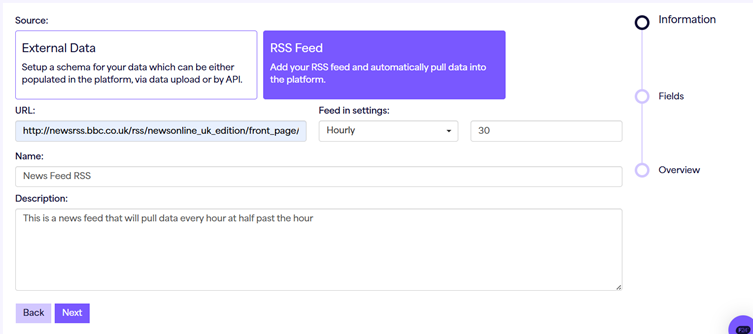
Select RSS, then name your Object and give it a description. Input the RSS URL and select how often you would like the data to be fed into the platform. This can be anything from weekly to daily, or even more regularly if required:
Step 2: Select your fields
Click Next, then select which fields you would like to pull into Force24 from your RSS feed. You must select pubDate, as it is a compulsory field that manages the recency of the latest published items from your feed:
Step 3: Match the pubDate format
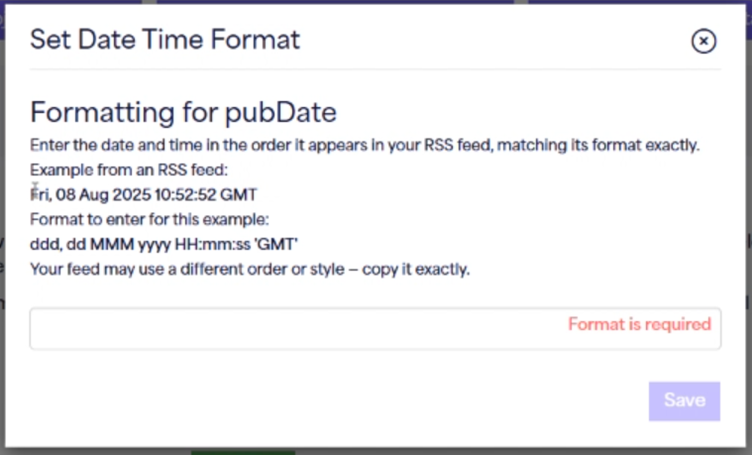
On the pubDate field, you need to align the date and time format with whatever appears in your feed. For example, if the feed shows Fri, 08 Aug 2025 10:52:52 GMT, that translates as:
ddd, dd MMM yyyy HH:mm:ss 'GMT'
If the timezone is not specified as text, for example +00:00:00, you can use zzz instead.
Step 4: Choose your external ID
Once the fields have been selected, the next page is where you choose the external ID for your RSS feed. The external ID is the unique identifier for each instance. In this example, it would be the identifier for each of the news articles. You can select the external ID from the list of fields being pulled from your RSS feed, for example Title.
External ID limits
An external ID has a limit of 100 characters. It is restricted to the following characters: A to Z, a to z, 0 to 9, a space, and these symbols:
-"_~!$'(),;@={}^[]|
Step 5: Select pubDate and publish
You also need to select pubDate as the reference point for the last update, as mentioned earlier.
Finally, click Next and save and publish the Object to begin using it.
Need a hand?
If you have any questions, reach out to us on live chat using the chat bubble at the bottom right of your Force24 platform. Our team is happy to help.